CADVANCE News
February 2004 Feb. 2004 Issue
For all the latest Info
- www.cadvance.com
-
And much more…
THIS ISSUE
"CADVANCE -- THE BOOK": NOW AVAILABLE!
Written by Mr. John B. Montgomery, AIA
FREE CADVANCE V6.5 Reaches 30,000 Downloads
"CADVANCE -- THE BOOK" NOW AVAILABLE!
Dear CADVANCE Users:
The long-awaited CADVANCE -- THE BOOK, a 3-year project created by Mr.
John
B. Montgomery, AIA
and longtime CADVANCE user for 20 years, is finally completed and is now available from F I T, Inc.! CADVANCE -- THE BOOK by Mr. Montgomery, is not a Reference Manual or a Tutorial, but is a Practical Manual for Operations for the Real World. Whether you are a beginner, novice, advanced, or expert CADVANCE User, CADVANCE -- THE BOOK will help you significantly with your productivity. Mr. Montgomery is an experienced Architect and is an expert CADVANCE User. You can now purchase CADVANCE -- THE BOOK for only $50 plus Shipping/Handling from FIT, Inc.
CADVANCE -- THE BOOK is a brand-new Book in PDF format and includes great new features.
Here are just a few of the features you will find.
-
New Bitmaps for your Toolbars
-
More convenient CADVANCE configuration files, for better practical use of CADVANCE
-
More fonts
-
New Symbols: Arch, Elec, Elev, HVAC, Plumbing, Site, Struct
-
Besides The Book, other valuable items included on the CD should be worth a lot more than $50!
Please visit Order Products On-line for the Order Form.
The top part of the BOOK is introduced here:
============================================================================
Table of Contents
Book I
-
Introduction, Dedication, Goals
-
Chapter 1 Getting Started, Some Setup Stuff
-
Chapter 2 Doing an Exercise
-
Chapter 3 Working with Symbols
-
Chapter 4 Working with Dimensions
-
Chapter 5 Working with Text
-
Chapter 6 Working with Printers/Plotters
-
Chapter 7 Working with Textures
-
Chapter 8 Working with Layers
-
Chapter 9 Working with Reference Files
-
Chapter 10 Working with Draw Construction
-
Chapter 11 Working with Building Grids
-
Chapter 12 Working with Toolbars
-
Appendix A
-
Bonus disk
-------------------------------------------------------------------------------------------------------------------
INTRODUCTION
This book is written to fulfill a promise to Mr. Takashi Furukawa and myself to pass along the inside experience of
using the program known as "CADVANCE". The Program, at the present time (2002), is issued as CADVANCE
2002, a work in progress since before Furukawa Information Technology Inc. picked up the baton and kept it
going forward while not losing the relative ease of use which characterizes it.
DEDICATION
-
To Takashi Furukawa and the members of his staff who have worked diligently toward the goals of the Users to produce a better product.
-
To the people who have worked with me over the years and learned to use CADVANCE proficiently and competently.
-
To those who had used another program and came to embrace CADVANCE with a passion. I was recently thanked by a former employee for training him in CADVANCE.
-
To those who came on board early in the development of CADVANCE, shared their ideas, concerns and problems with each other and faithfully supported the program through some very difficult years before FIT, Inc. came along and made the product better.
-
And, most of all to my wonderful Wife and Best Friend,
GOALS:
• Learn how to use CADVANCE to gain speed and accuracy.
• Learn to set up productive directories and CADVANCE ".ini" files.
• Learn how to deal with problems
• Learn how to reuse work already accomplished.
-----------------------------------------------------------------------------------------------------------------------------------------------------------------------------
C
hapter 1 – Getting Started, Some Setup StuffHOW TO USE THIS BOOK:
As we are aware, no book, no matter how well written, will do anyone any good what-so-ever, if one does not
read it thoroughly. At one time, I would suffer through the learning of a program by the "Hunt, Peck and Cuss
Method" and much to my chagrin, I lost many hours fumbling around not getting anywhere.
SO READ IT. First, reading the "Tech-no-babble" of a Manual is boring. TRUE!Second, consider the Computer. It is a machine and only knows what someone tells it. It can crunch
number faster than the eye can blink, however, it cannot rationalized or initiate a drawing, design or write
a manuscript without the operator inputting data. It is not smarter than the operator and should not be
intimidating. Still, the neophyte is awed by what it should be able to do.
Forget it, computers are logical processors of data inputted by the operator and keep in mind that is all it is and
when an error occurs, think of the logical process in which the machine arrives or arrived at the error. Two plus
Two equals Four under normal circumstances.
What is next? Getting Started
I have written this book with the idea that you should place it next to your computer with the program running. It is
basically a follow along book. Do the exercises as you read the information provided.
If you are set up and ready, let’s get on with the business of learning CADVANCE. I am not going to deal with
the entire command structure in the beginning. We will take them up as we progress through the exercises.
Did you boot up your computer and get CADVANCE up on the screen so you can follow along? Take a look at
the top of the screen. As in most programs this is where CADVANCE displays the drop down menus, "File",
"Edit", "Alter", etc. as shown in the figure below. The commands under each category do what the indicated
category says, for instance, "Draw" has under it the command "Line" the arrow to the right of Line opens a
submenu for "Single Line", "Line Sets", Tangent", etc. Try each of the different lines out and see what they do.
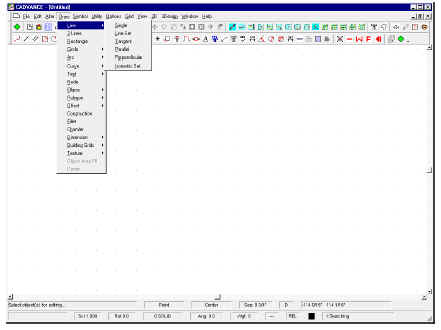
Figure 1-1
Using CADVANCE or any other CADD program is not as easy as one would think. The dog and pony shows, that
some of the software companies put on, are just that, a canned program demonstrating their product. There is a
lot of setup connected to the
"Whiz-bang" demos. At times, I have attempted to get the demonstrators todeviate from their routines and things went haywire, if they even would try to appease me. Normally, it takes
about as much time to CADD draw a project as it would to do it by pencil and paper the old way, but then, its
advantages are as follows:
Efficient reuse of details, symbols and complete drawings.
Accuracy of drawing with a CADD program. The drafter has the capability of drawing to a tolerance not available with pen, pencil, and paper.
Modification of existing drawings for revisions or corrections becomes easier than the old way.
WHY BOTHER DRAWING ACCURATELY? WHY NOT?
We now have in our grasp, the ability to achieve work of greater accuracy and consistency not known before the
development of Computer Aided Drafting and Design programs. This accuracy and consistency is necessary to
eliminate mistakes and errors at the construction site and in the estimation phase as well. This applies to any
process of construction or manufacturing. Errors and Omissions account for the most cost increases to projects
and may lead to litigation. Therefore, it behooves the drafter/designer to use the machine to achieve the
accuracy necessary eliminate the errors. Omissions are vested in the knowledge and experience of the
drafter/designer.
"MISTAKES".
We all should take pains to eliminate "mistakes" from our vocabulary and work. I have always believed in the
concept of;
"DO IT RIGHT THE FIRST TIME", whenever possible. It can be accomplished if one has the desireof not having to do a task over and over to get it correct. Our employers/clients often have us redo the work over
and over due to changes in minds or requirements, this cannot be helped. Employers and Clients will many times
will change their minds. However, we have the opportunity to reduce the tendency for change by presenting a
clear and concise design which will instill a feeling of confidence in our work and perhaps, reduce the need for
change.
How do we achieve accuracy?
First, by using our minds and thinking about the elements necessary for a complete drawing. Second, by using
the machine’s program to its fullest. CADVANCE makes this task fairly easy once you are acquainted with its
methods. In CADVANCE there are usually several ways to accomplish the same task. Which one you use will
depend on your knowledge of the program and which method will serve you best.
COORDINATE MODES
Before we get into an actual exercise, I would like for us to explore the Coordinate Modes available in CADVANCE. Imagine the screen as the CADD world, divided into four areas by a vertical line and a horizontal line intersecting at the center of the screen. Just like the "X" and "Y" lines from Trigonometry or Analytical Geometry, if memory serves me.
Below is how the different modes are used in CADVANCE:
-
ABSOLUTE (ABS):
RELATIVE (REL):
POLAR (POL):
POLAR ABSOLUTE (PAB):
Of the four modes, the Relative and Polar are the best and easiest to use. Absolute mode is very handy on Site
Plans for the location of buildings and objects relative to a coordinate point or base point located on the site which
has been established by using data from Global Positioning Satellites (GPS).
ANGLES
As in Analytical Geometry, the way CADVANCE handles angles is that 0
º is to the right on the screen, 90º is atthe top of the screen, 180
º is to the left and 270º is to the bottom. The angle numbers go up counter-clockwisewhich is backwards to the normal compass points we are more familiar with. The use of distance and angle will
be discussed later.
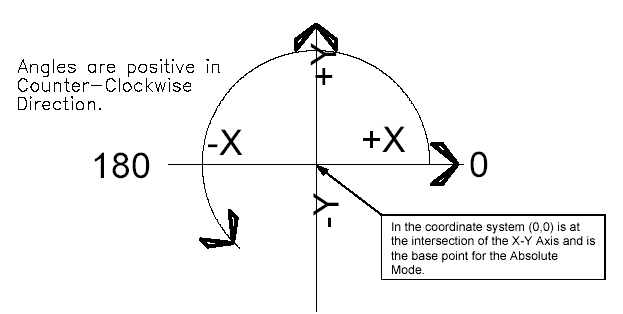
Figure 1-2
SPECIAL KEYS
:RIGHT BRACKET KEY ( ] ):
When touched brings up a dialog box which requests input from the user. Depending on the Coordinate Mode, the input will be the distance in the "X" direction and the "Y" direction or the distance and angle from a point. For example: If the user wishes to draw a single line and has called the DRAW/Line/Single from the menu and wants to draw a line to the right, the user would click the mouse at the point on the screen to start the line. Then by touching the Right bracket key, the dialog box would appear and the user wound input: X=25’-3" and Y=0, this would yield a line going from apoint to another point 25’-3" to the right on the screen.
The next illustration shows the dialog box.
In the coordinate system (0,0) is at the intersection of the X-Y Axis and is the base point for the Absolute
Mode.
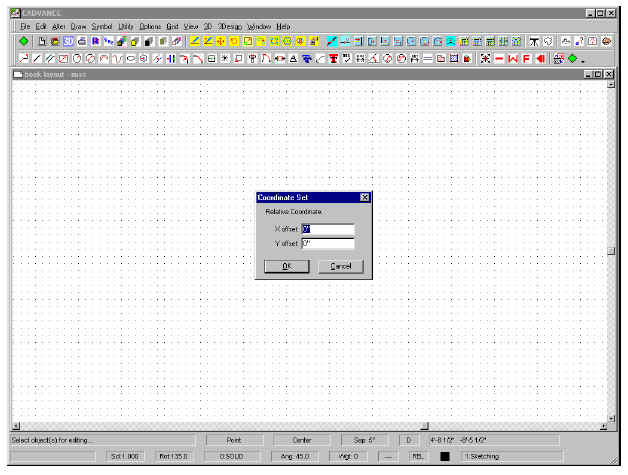
Figure 1-3
LEFT BRACKET KEY ( [ ):
This key is used to change the Coordinate Mode. When touched a selection list near the status lineat the bottom of the screen will indicate:
ABS, REL, POL or PAB. To select either click on yourchoice or touch the letter underlined on your choice thus:
"R" for RELATIVE, "P" for POLAR. Relative Mode requires dimensional input both in the "X" direction (plus or minus) and also the "Y"direction (plus or minus). Remember the Coordinate system, Plus ( + ) "X" is right on the screen and
Negative ( - ) "X" is left on the screen, while Plus ( + ) "Y" is up on the screen and Negative ( - ) "Y" is
down on the screen. The same is true with any input for the different Modes. A negative dimension
or Angle in Polar Mode will reverse the directions, try it.
The next Illustration shows the selection box in the lower right of the screen just above the status line.
Selection may be touching the keyboard key which is underlined under the mode desired or you may
click on the mode you want to work in.
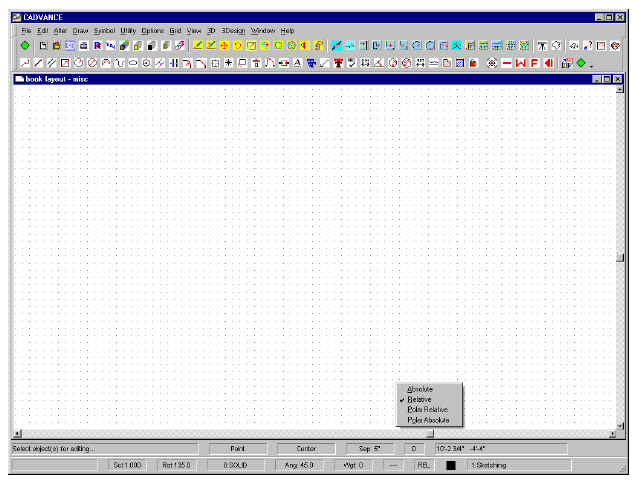
Figure 1-4
This method of dimensional input applies to anything needing that form of input. Some inputs are either setup
ahead of time or on the fly. We will take this up next in Chapter 2..
Before we go on, I need to point out that your screen may not look exactly as shown. If you loaded the files I
have included, and followed the instructions, it should look as depicted above. Especially with respect to the
toolbar buttons. If setup correctly, the tool buttons will display tool tips if you hold the cursor over the button for a
moment as with other Windows programs.
CADVANCE was, to my knowledge, the first CADD program to actually embrace the Windows environment fully.
One of the other major brands tried to shoe horn their code into the environment much to the dismay of their
users. Considerable Lockups, Crashes, etc. would occur for no real reason at all. The users of CADVANCE at
that time could only grin to themselves and keep on using.
I would like to point out at this point that when I use the term, "Touch" it is with respect to keyboard strokes, rather
than using the word, "HIT". Let’s not destroy the keyboard yet. Also, whether you use a mouse or a tablet, they
usually have a right and left button or other method of selection. In CADVANCE, if you are set up for righthanded
use, the left button is to select with and the right is for "escape" or "deselect" CADVANCE has several
ways to do just about everything, thus giving it the versatility we long time users continue to enjoy. No one way is
more correct than the other and the user should explore to see which methods are the most efficient for the task.
I use a combination of mouse and keyboard input with my left hand on the keyboard to execute such commands
as; Duplicate (copy) (Shift + F2), Move (F2), Offset from a point (Ctl + F2), Find (F3), Redraw Screen (F5),
Repeat Last Command (F6), Set Cursor Step Size (F7), Change Cursor Type (F8), Start a Macro (F9) and use
Help (F1).
=============================================================================
You can now purchase CADVANCE -- THE BOOK for only $50 plus Shipping/Handling from FIT, Inc.
![]()
CADVANCE 2002 - "What's New" Feature List
-
CADVANCE 2002 is a perfect tool for architects, engineers, and designers.
![]()
Mr. Montgomery has already begun work on "Book 2" for distribution.
CADVANCE STILL GOING STRONG!
CADVANCE FREE V6.5 DOWNLOAD HITS 30,000 DOWNLOADS WORLDWIDE!
Dear CADVANCE Users:
In April of 1999, F I T, Inc. officially
re-released CADVANCE Version 6.5 as a free download from www.cadvance.com
web page, based on Mr. Takashi Furukawa's belief in contributing to
society by providing
a needed service to many people worldwide with professional CAD
software, CADVANCE V6.5. Those people may have limited financial
resources to purchase such professional CAD software.
Today our record shows that the number of downloads of Free CADVANCE V6.5 reached 30,000 downloads worldwide. In January, there were approximately 800 downloads. Among the people downloading were a wide variety of professions, including Students, Hobbyists, Home users, Attorneys, Musicians, Woodworkers, Scientists, Researchers, and so many others you can think of, in addition to Architects and Mechanical Engineers. There continue to be about 30+ downloads per day, worldwide, from all over the world: many countries ranging from north Europe to Africa, the Middle East, from north America to south America, from Russia down to Australia, covering the world where internet is available.
In response to our question how you learned about Free CADVANCE V6.5, we have received a variety of responses, including "Web," "Associates," "Friends," and "Dad." F I T, Inc. is pleased to be contributing to society, and we are proud of this achievement, in keeping with our original intention to significantly contribute to society.
Visit HERE for our download page for FREE CADVANCE 6.5:
-
CAD software system designed for Windows 3.1, yet also runs on Windows 95/98/NT/ME/2000, Windows XP Home, and Windows XP Professional. Originally released in 1995 at a suggested retail price of $1950, it is now available to anyone free of charge for the software.
![]()