|
|

|
|


|
|||||||||||||||
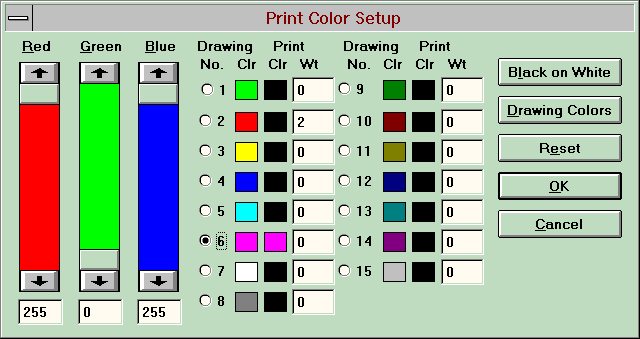
This is the CADVANCE dialog screen (File/Print/Colors) where you match a color on the drawing to a specific RGB color to print. The RGB colors must match precisely the numbers on the bottom of the previous page that correspond to your specific plotter. In this example, notice that Color 6 has been changed to its HP equivalent of Red Violet (255, 0, 255). The same RGB is considered as Magenta for Houston/Summa and Calcomp plotters in the Control Panel. Notice that pen numbers cannot be linked to a color on this screen. Rather, the print color is conveyed to the Windows Main Screen/Control Panel/Printers/Setup screen and there the RGB Color Name can be linked to a specific pen number with a specified weight. Of course, this type of link only applies to pen-type plotters. If you have a color Inkjet, LaserJet or DesignJet type printer you need to plan this screen so that the RGB values match those on the color chart that came with your printer/plotter. This means that there will be a maximum of 15 colors on each plot (remember... white won't plot on white paper).
To attain specific line weights with color or black and white printers, you have 2 options. 1. You can draw with weighted lines (see the Setup Screen). 2. You can weight the colors on the Print Color Setup page.
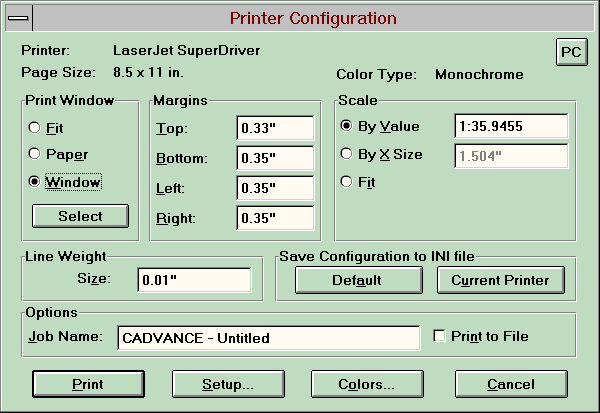
Each of you is going to have to create and save INI files for your particular printing preferences. The key factor here is the Print line weight value that you specify. After you install your driver in the Control Panel, re-select the printer in CADVANCE's File/Printer Setup. Then in File/Print, the driver will specify a default line weight of say .0033. You must do some experiment plots with the TESTPLOT.VWF file you received to determine what you prefer as the thinnest line value. I found .01 to be ideal on my LaserJet, but you need to decide on your particular printer/plotter. Additionally, this value also influences Cad Text and it is saved in the INI file. You will also notice an additional column on the File/Print/Color page. The Print Weight value you place next to a color is a multiple of the line weight you specified on the Printer Configuration page. As an example, let's say you select the Black on White button, and change the value next to the Screen Color Red / Print Color Black to = 2. On the plot, all Red entities on the screen (including Red text) will print out twice as thick in Black. After you've gotten all the settings where you want (and prior to printing), you can save them to the current INI by simply selecting the button on the print page. Everything you set will be retained in the INI. You can have multiple INI's for various printers or projects, too. To save a new INI, you must print the file, then go to File/Save As and change File Type to Configuration (INI), give it a new name and OK. To utilize another INI, simply File/Open it and re-select the printer in File/Printer Setup. If you make any changes to the File/Print dialog box, you can select the Save INI to Current Printer button. Once this screen has been setup correctly, follow the steps on the first page of this document for saving a specific configuration in an INI file. Most companies only use 1 or 2 different Print Color Setups on a regular basis to insure consistency in both colors and line weights.
|
|||||||||||||||
|
End of Lesson 6 - Next Lesson >>>
|
|||||||||||||||
Home | Products | News | Technical | Forum | Gallery | Downloads | Links | About FIT